
Introduction
In a large enterprise, there are many SAP integration suite artifacts that are working well. When we want to transport selected artifacts from the development environment to the QA or production environment, doing it manually by exporting and importing usually leads to errors and can be time-consuming.
This is where SAP Cloud Transport Management (CTMS) helps. It allows us to transport selected integration suite between subaccounts in a controlled way. It also gives better tracking and control over what gets moved and when.
This blog post covers all configuration steps that you can follow to implement the solution in the above scenario. It demonstrates how you can transport SAP Integration Suite artifacts from a source subaccount to a target subaccount using SAP Cloud Transport Management and SAP Content Agent. SAP Content Agent is the agent that assembles the artifacts on the source subaccount and exports it to the SAP Cloud Transport Management service. On the target subaccount, SAP Content Agent handles the artifacts deployment. SAP Cloud Transport Management service acts as an intermediary that allows transport to be run between the source and target subaccounts.
This blog will guide you on:
- How to configure the source subaccount?
- How to configure the target subaccount?
- How to create Destinations in the SAP BTP source subaccount?
- How to create Destinations in the SAP BTP Target subaccount?
- How to create a target Destination In the source subaccount?
- How to create a source node and a target node in the SAP Cloud Transport Management user interface?
- How to enable the transport in SAP Integration Suite?
- How to test your transport?
Prerequisites
- An SAP BTP account with two subaccounts, One as the source subaccount (Development), while the other as the target subaccount (Test)
- You have SAP Integration Suite created in both subaccounts with the Integration_Provisioner role assigned to users.
Configure source subaccount
You need to configure your Source Subaccount, which have been named Development. In this subaccount, you will configure Cloud Transport Management Services, add SAP Content Agent Services (CAS), add SAP Process Integration Runtime, create Destinations
Configure Cloud Transport Management
Here, you will configure Cloud Transport Management which serve as an intermediary for transport between the source and target subaccounts.
Add Service Plans
Cloud Transport Management have two service plans, Standard and Application. You are going to add both plans in this step. To do so:
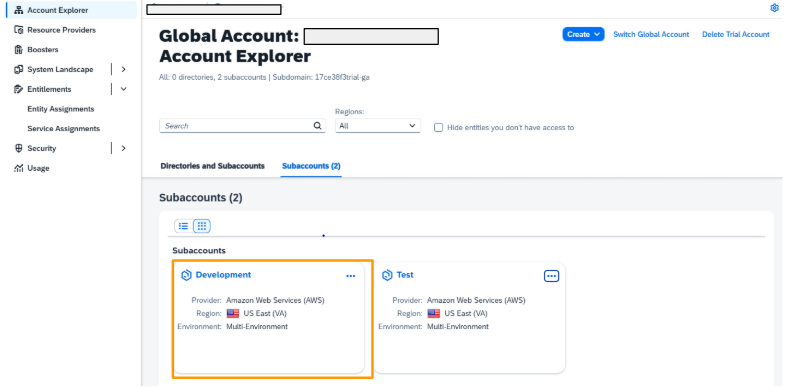
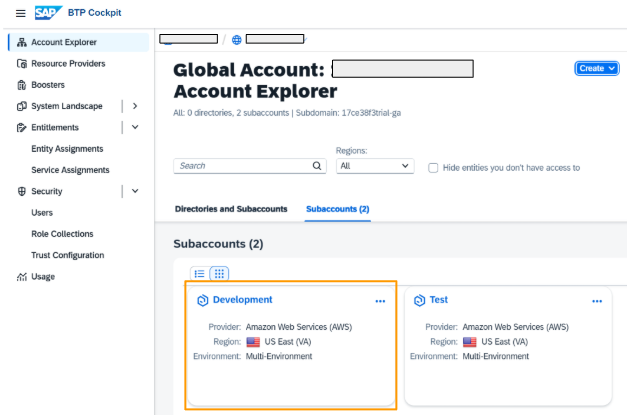
- Log on to your SAP BTP global account. Choose the Development (Source) Subaccount tile
- First, check if Cloud Transport Management Standard and Application Service Plans have been added to Entitlements. Choose Entitlements from the navigation on the left (1), filter the entries for Transport (2).
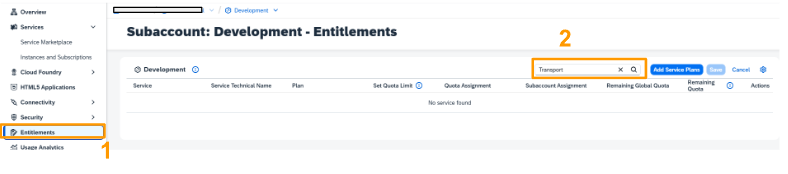
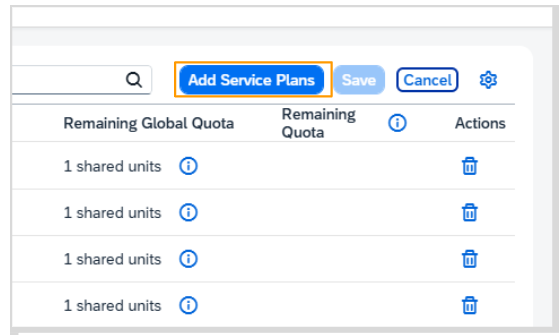
- No service is found for Cloud Transport Management. To add, click on the Add Service Plans button

- Filter the entries for Transport (1). The two plans (2), Standard and lite (Application) are available. Check both boxes. Click on Add 2 Service Plans (3)

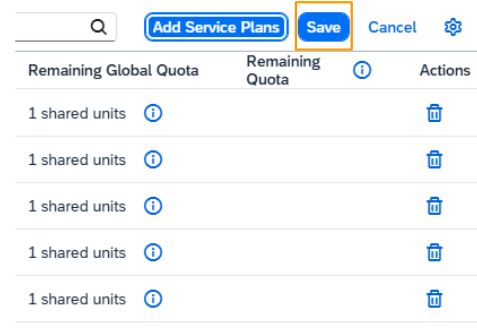
- Click on Save button.
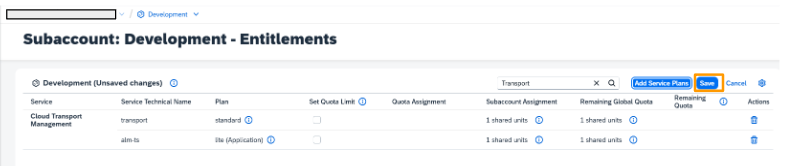
6. The two plans, Standard and lite (Application) are now added
Subscribe to SAP Cloud Transport Management Service
To enable the usage of the user interface of SAP Cloud Transport Management service, subscribe to the Cloud Transport Management application.
- In your Development subaccount, go to Services > Service Marketplace (1). Filter for Transport (2). The Cloud Transport Management tile is displayed (3).

- Select the three dots (…) on the tile, and choose Create.

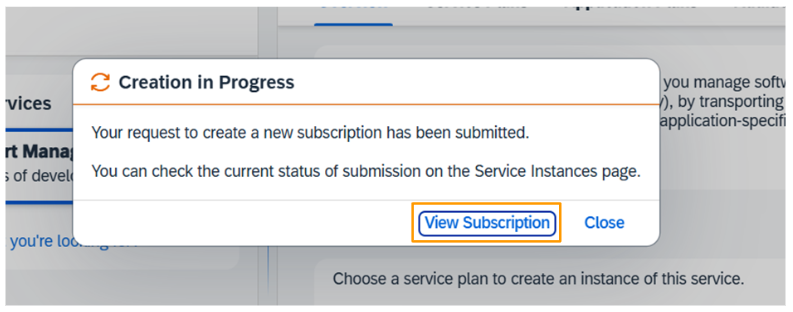
- On the New Instance or Subscription dialog, from the Plan dropdown box (1), select lite and choose Create (2).

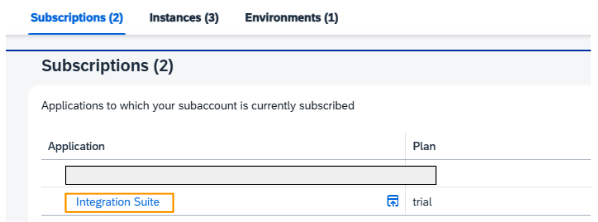
- On the Creation in Progress dialog, choose View Subscription.
- You’ve subscribed to the Cloud Transport Management application.

Create CTMS Instance and Service Key
Service instance enables the usage of SAP Cloud Transport Management via an API Remote Call. You need the service instance to export content directly in your application. Service key is what you provide to create a destination to SAP Cloud Transport Management service.
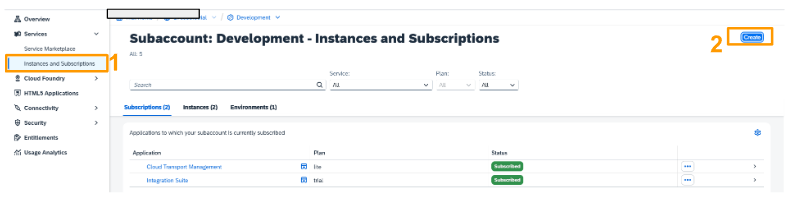
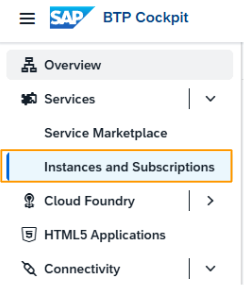
- In your source subaccount, choose Services > Instances and Subscriptions (1). Choose Create (2).
- From the Services dropdown menu, select Cloud Transport Management (1). From the Plan dropdown menu, select the standard plan of the Instances type (2).
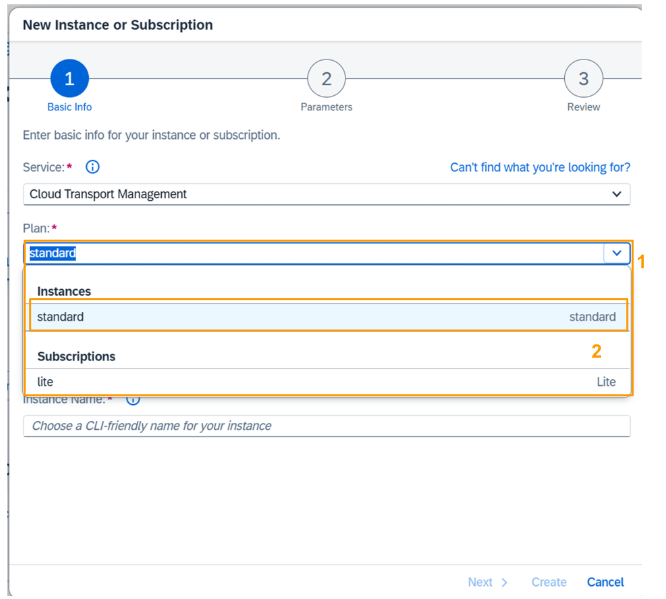
- Enter an Instance Name (1), and choose Create (2). Don’t choose Next, because the next step is not necessary for SAP Cloud Transport Management.

- The service instance is being created.

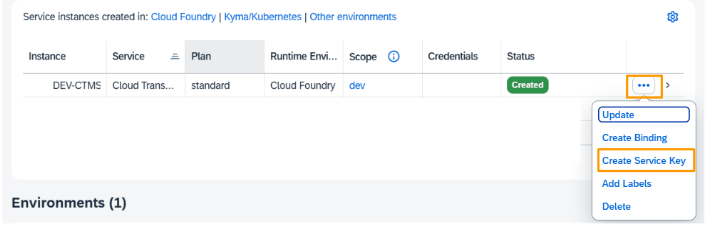
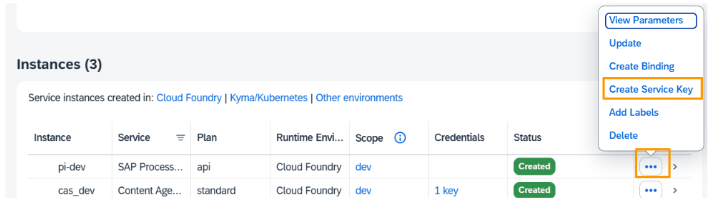
- When the instance is created, you can create the service key. Select the three dots (…) at the end of the row and choose Create Service Key.
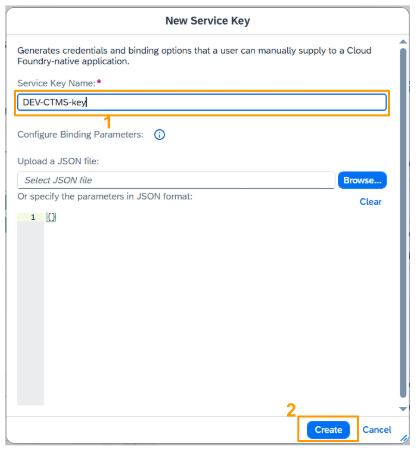
- On the New Service Key dialog, enter a name for the service key (1), here DEV-CTMS-key, and choose Create (2).
- The service key is created. To display it, select the three dots (…) at the end of the row and choose View.
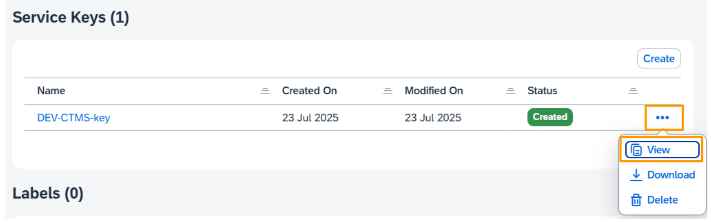
- The service key looks as follows. For the destination to SAP Cloud Transport Management service, you need, for example, the values of clientid, clientsecret, and url in the uaa section.

Set Up Role Collections for SAP Cloud Transport Management
The next thing after the successful subscription is to configure user access to the SAP Cloud Transport Management application. You will need to create different role collections for the different SAP Cloud Transport Management roles. Thereafter, you will assign the role collections to users
This step is crucial because a user needs to be assigned roles or permission before they can use the user interface of the SAP Cloud Transport Management.
Create role collections for the roles to be used for the service
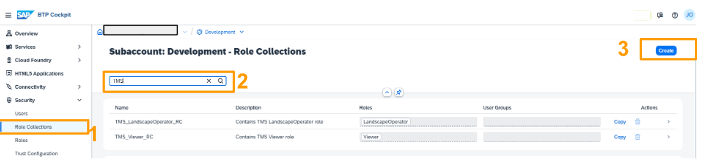
- Choose Security > Role Collections from the navigation on the left (1). Filter for role collections called TMS (2). The delivered role collections are displayed. Choose Create (3).
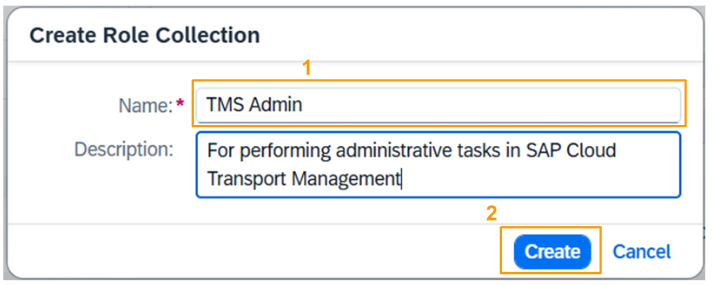
- Enter a name, here TMS Admin (1), a description, and choose Create (2).
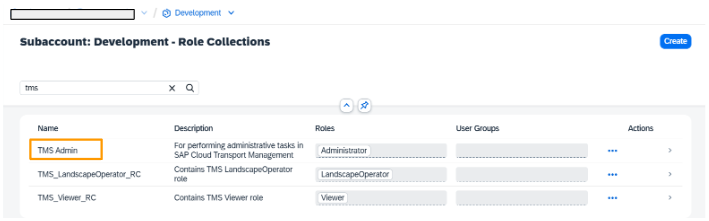
- The role collection, TMS Admin was created.
Assign the SAP Cloud Transport Management Administrator role to the new role collection
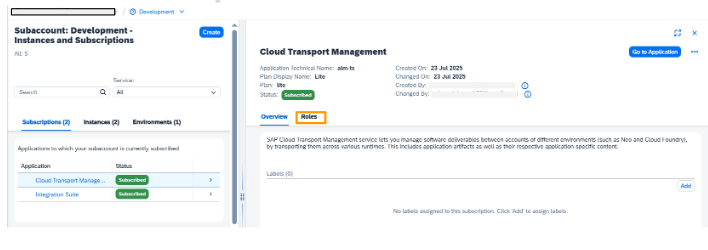
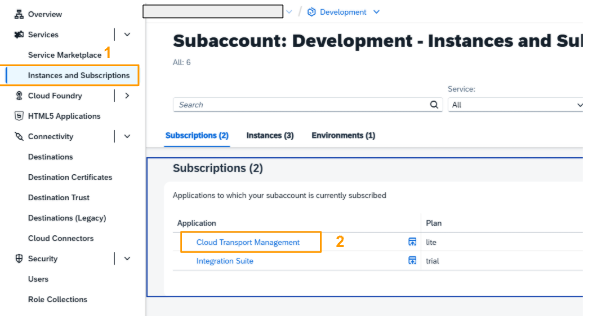
- Choose Services > Instances and Subscriptions from the navigation on the left (1), and select the arrow at the end of the Cloud Transport Management row (2).
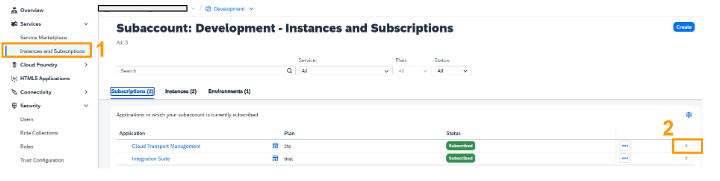
- Select the Roles tab.
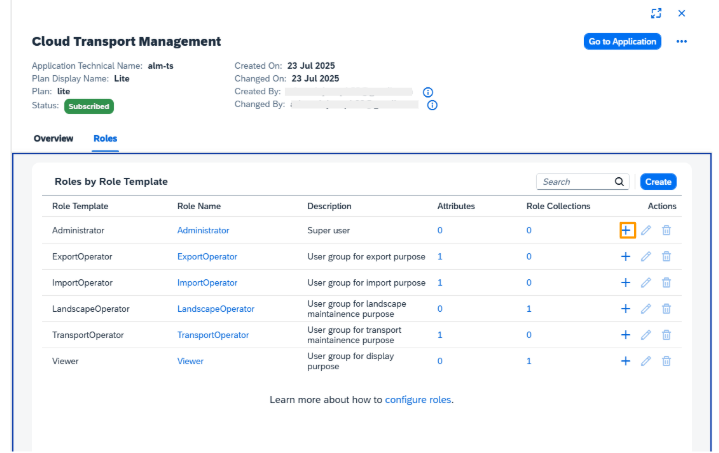
- On the Roles tab, the default role templates for SAP Cloud Transport Management are displayed. In the row of the Administrator role template, choose the + button.
- On the Add to Role Collection dialog box, select the TMS Admin role collection (1), and choose Add (2).
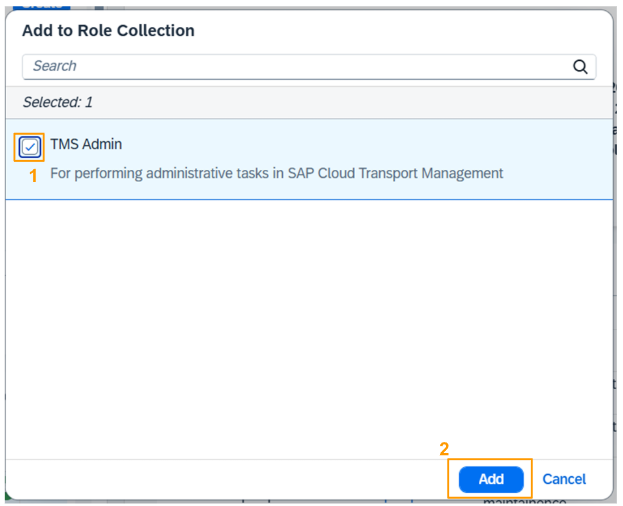
- The role collection was added to the Administrator role template.

Add users to the new role collection.
Now, proceed to add a user to the role collection with the following steps:
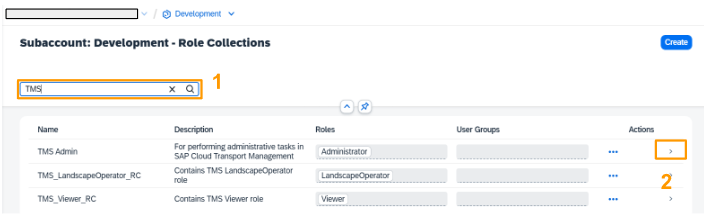
- In your source subaccount, choose Security > Role Collections from the navigation on the left.

- .Filter for the TMS role collections (1). Select the arrow at the end of the TMS Admin row (2).
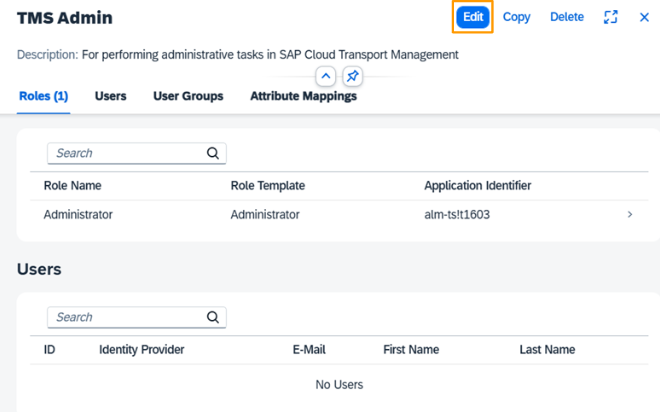
- In the details of the TMS Admin role collection, choose Edit.
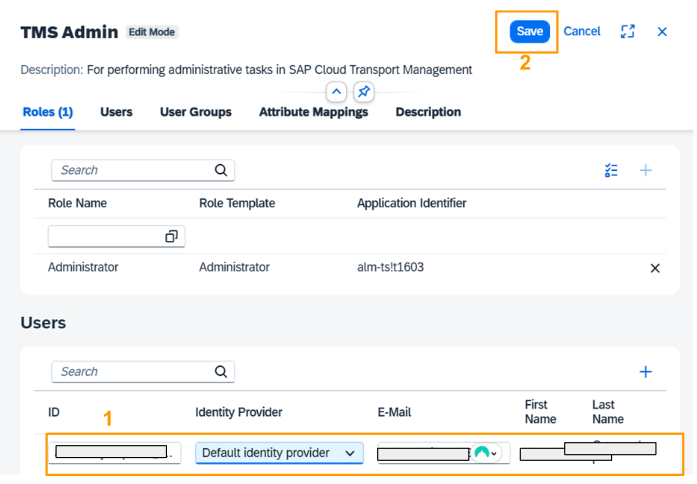
- Go to the Users row,, select Default identity provider. In the ID field, enter an existing e-mail address (1) and choose Enter. The E-Mail field is automatically filled with the selected e-mail address. Choose the Save button (2).
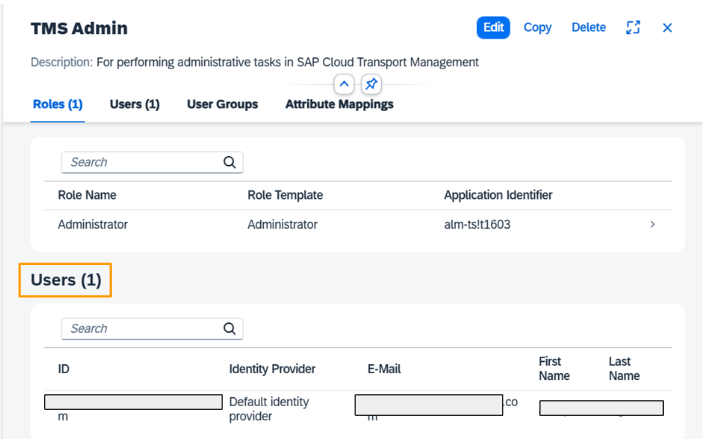
- The role collection was added to the selected user. You see that One user is displayed.
Add SAP CAS (Content Agent Service)
In the source subaccount, SAP Content Agent assembles the artifacts and exports it to the SAP Cloud Transport Management service.
Create a Service Instance for SAP Content Agent
For the transport scenario, API access to the SAP Content Agent is enabled by creating a service instance.
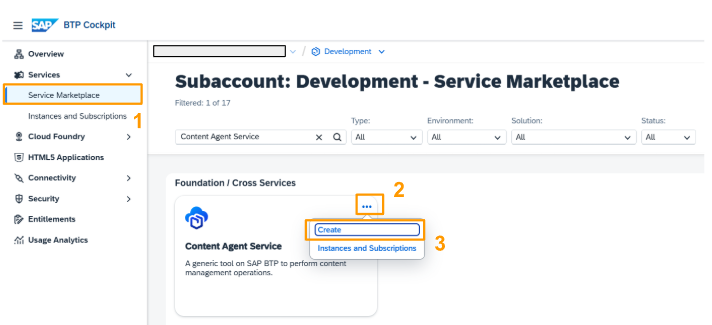
- In the source subaccount Development, choose Services > Service Marketplace from the navigation on the left (1). In the search field, filter for Content Agent Service (2). On the Content Agent Service tile, select the three dots …, and choose Create (3).
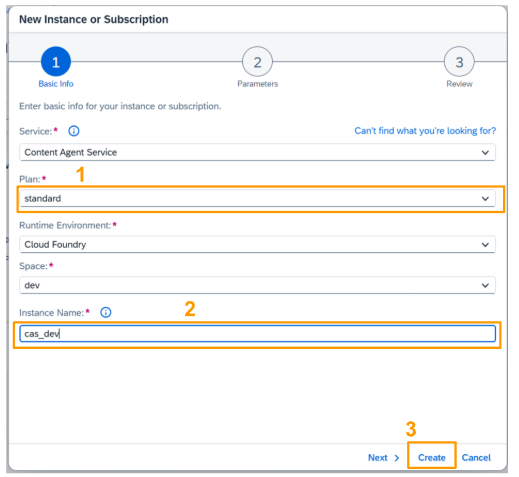
- Select the standard plan (1) from the Plan dropdown menu of Content Agent Service. You may leave the values for Runtime Environment and Space unchanged. Enter an Instance Name, here we have used cas_dev (2). Choose Create (3).
- On the dialog box, choose View Instance to monitor the creation progress.

- When the instance creation is completed, the instance gets the status Created.

Create a Service Key for the SAP Content Agent Instance
The service key details of the SAP Content Agent instance are required for the configuration of the SAP Content Agent destination.
Follow the steps below to create a service key for the SAP Content Agent instance:
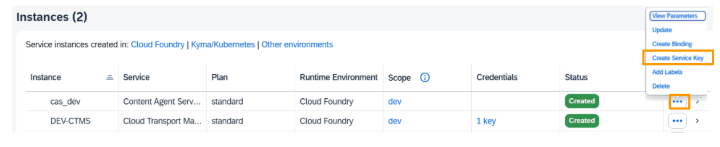
- In the service instance row, select the three dots …, and choose Create Service Key.
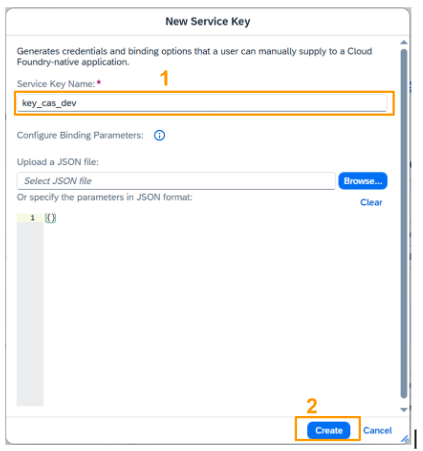
- Enter a name for the service key (1), here key_cas_dev, and choose Create (2):
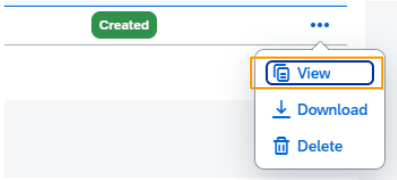
- The service key was created. Select the three dots … in the service key row, and choose View.

- The service key looks as follows. You’ll need them when you create the SAP Content Agent destination.

Add SAP Process Integration Runtime
Create a Service Instance for SAP Process Integration Runtime
API access to SAP Process Integration Runtime is required for the transport scenario. To enable API access, you'll create a service instance. Ensure your user has the Integration_Provisioner role collection assigned.
To create an instance for SAP Process Integration Runtime
- Choose Services > Service Marketplace from the navigation on the left (1). Filter for Process Integration in the search field (2). On the SAP Process Integration Runtime tile, select the three dots …, and choose Create (3).
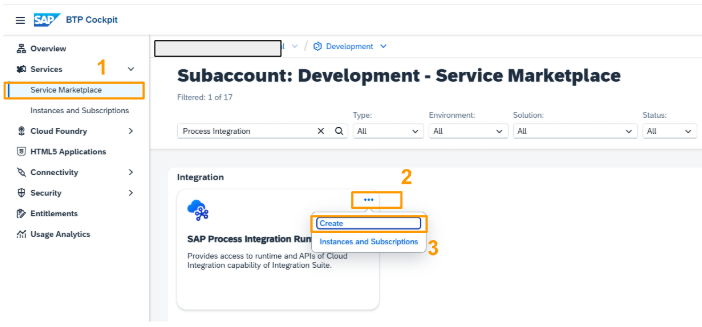
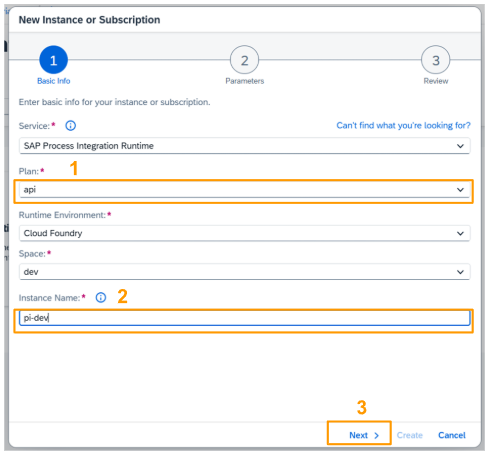
- Select the api plan from the Plan dropdown menu of the SAP Process Integration Runtime service (1). You may leave the values for Runtime Environment and Space unchanged. Enter an Instance Name, for example pi-dev (2), and choose Next (3).
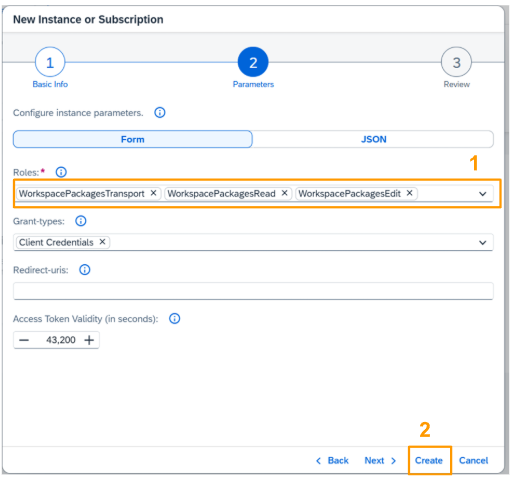
- The following roles are required for the instance: WorkspacePackagesTransport, WorkspacePackagesRead, and WorkspacePackagesEdit. Select them from the Roles dropdown menu (1), and choose Create (2).
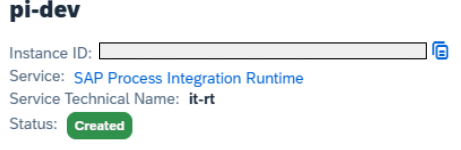
- The SAP Process Integration Runtime instance was created.
Create a Service Key for the SAP Process Integration Runtime Instance
The details of the service key of the SAP Process Integration Runtime instance are required for the configuration of the SAP Cloud Integration destination. This destination is required for the communication of SAP Content Agent with SAP Process Integration Runtime.
- In the service instance row, select the three dots …, and choose Create Service Key.
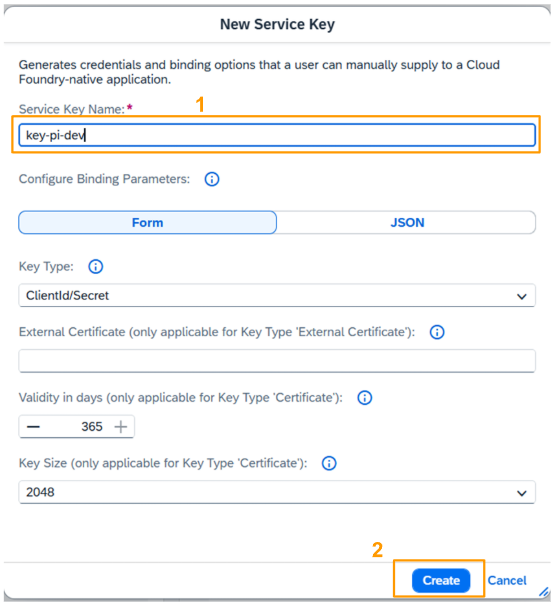
- Enter a name for the service key, here key-pi-dev (1), leave the other values unchanged, and choose Create (2).
- The service key was created. Select the three dots … in the service key row, and choose View.
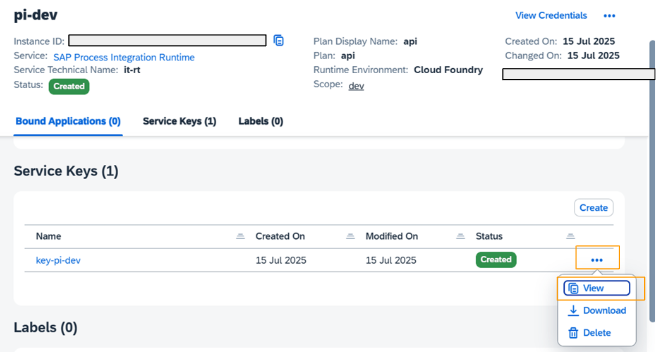
- The service key looks as follows. Leave the service key open so that you copy the required values in the next step, or note down the values of url, clientid, clientsecret, and tokenurl.

Set up API Management
Add entitlement for API Management, API Portal
We need to configure entitlements and enable API Management, API Portal.
- Choose Entitlement

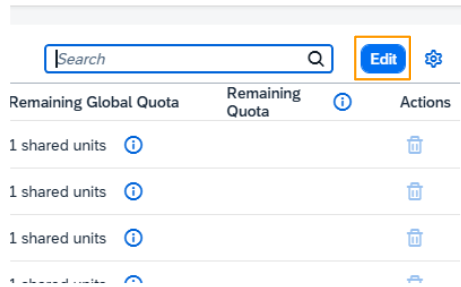
- Choose Edit on top right corner
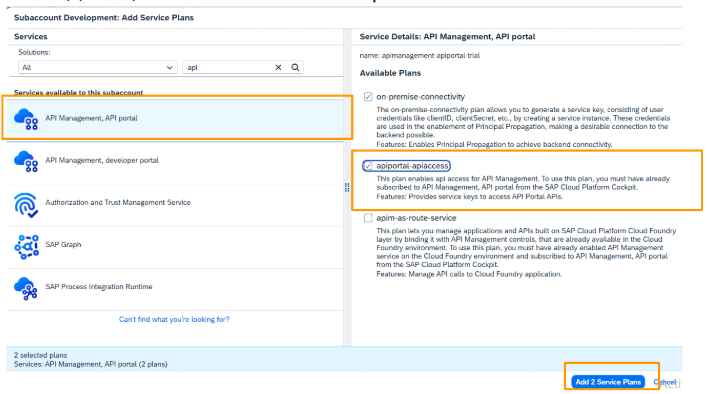
- Choose Add Service Plan
- Choose apiportal-apiaccess. Choose Add Service Plans
- Choose Save
- Do the above steps in the target subaccount
Create a Service Instance
We need to create a Service Instance for API Management , API Portal
- Enter the service instance details Then choose Create
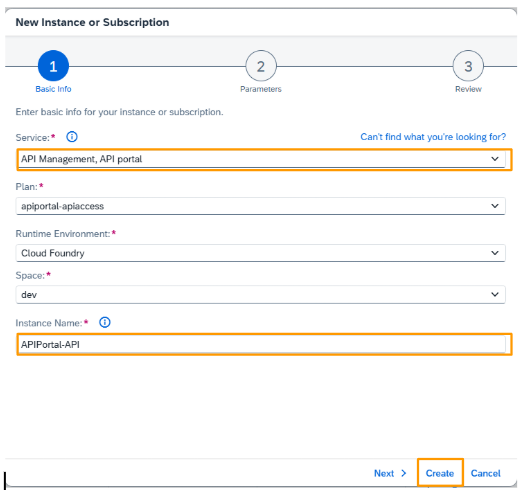
- The service instance is created
Create a Service Key
- Create a service key for the service instance
- View the Service key
- Copy the Service Key URL, clientId, clientSecret, tokenUrl as they would be needed to create APIManagement destination in the source subaccount.

Configure target subaccount
For the target subaccount, integration suite has already been setup by the user. We are going to add SAP CAS, SAP Process Integration Runtime. In this subaccount, we will have 2 instances, 2 service keys, and 2 destinations.
Add SAP CAS
For the transport scenario, API access to SAP Content Agent is required also on the target subaccount. First create a service instance.
Create an SAP CAS Instance
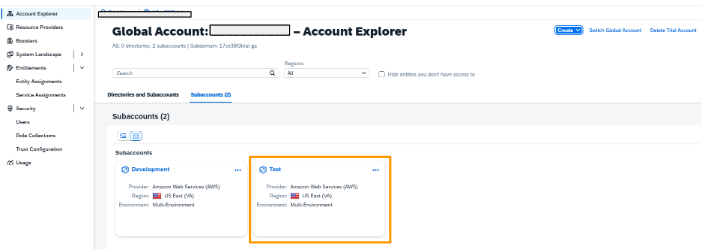
- In your SAP BTP global account, choose the target (Test) subaccount
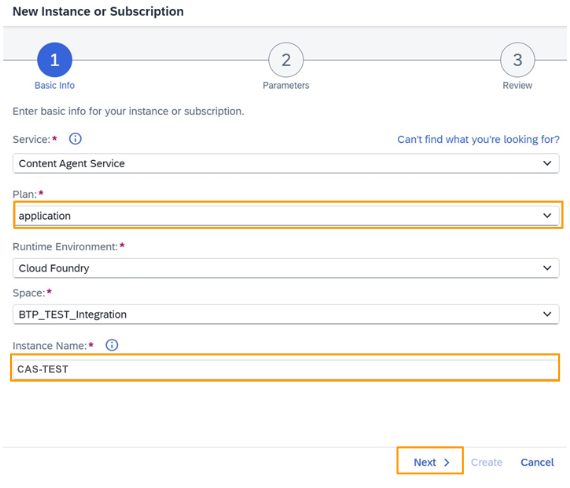
- Choose Services > Service Marketplace, and filter for Content Agent Service. On the Content Agent Service tile, select the three dots …, and choose Create.
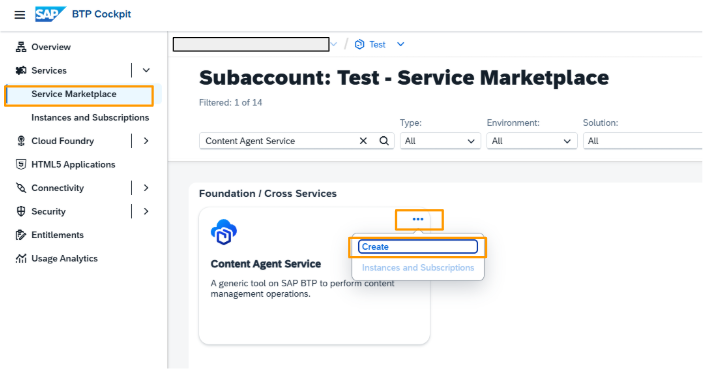
- Select the application instance plan. You can leave the values for Runtime Environment and Space unchanged. Enter an instance name, CAS-TEST, and choose Next.
- Select the Import role (1), and choose Create (2).
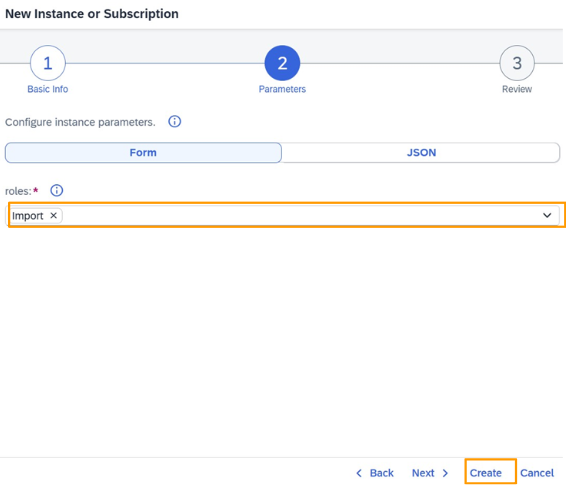
- The SAP Content Agent instance CAS-TEST was created.

Create a Service Key for the SAP CAS Instance
The details of the service key of the SAP Content Agent instance are required for the configuration of the destination to SAP Content Agent in the target subaccount that you’ll configure in the SAP BTP source account.
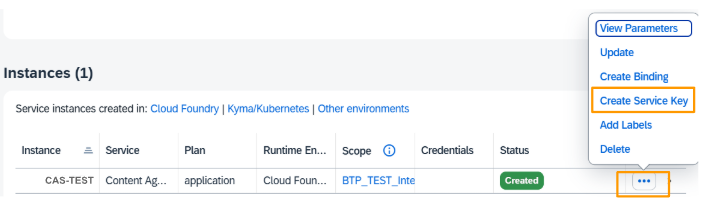
- In the service instance row, select the three dots …, and choose Create Service Key.
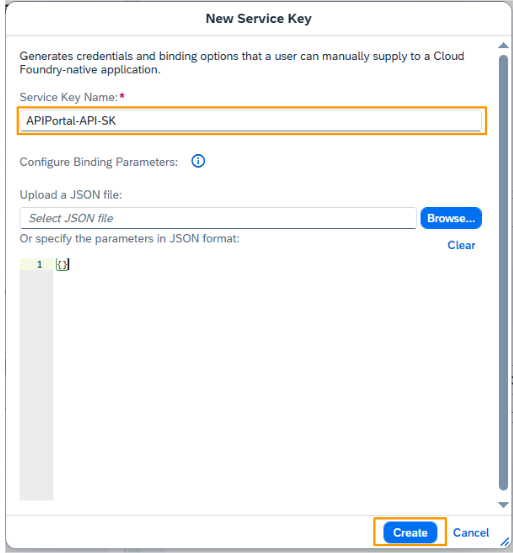
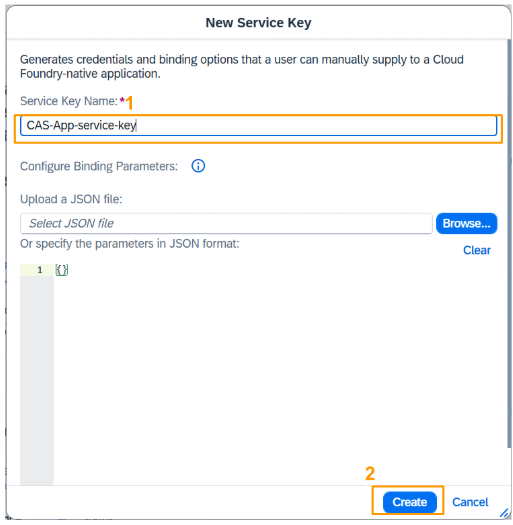
- Enter a Service Key Name, here CAS-App-service-key (1), and choose Create (2).
- The service key was created. Select the three dots … in the service key row, and choose View.
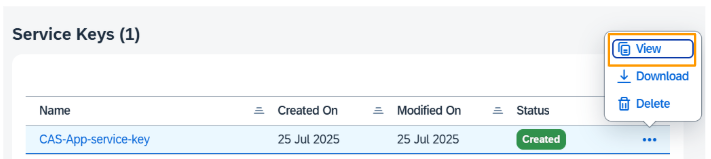
- The credentials are displayed. Leave the service key open so that you copy the required values of url, as well as clientid, clientsecret, and url from the uaa section when needed.

Add SAP Process Integration Runtime
For the transport scenario, API access to SAP Process Integration Runtime is required also on the target subaccount. First create a service instance.
Create a Service Instance for SAP Process Integration Runtime
Make sure your user has the Integration_Provisioner role collection assigned.
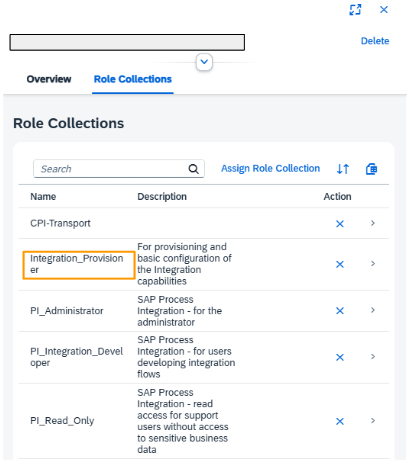
- To check if user has the integration_provisioner role,, choose Security > Users from the navigation on the left (1). Choose the arrow at the right end of the user role (2).

- The role collections of the user display. You will find the Integration_Provisioner role collection.
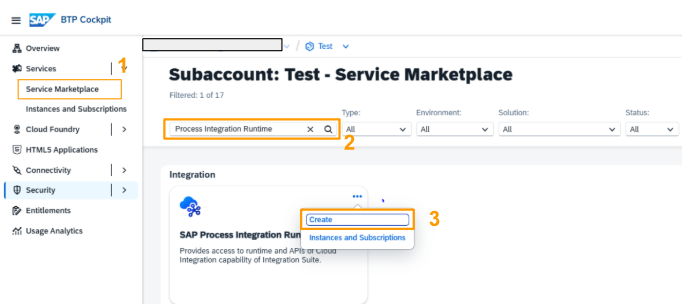
- To create an instance for SAP Process Integration Runtime, choose Services > Service Marketplace (1), and filter for Process Integration Runtime in the search field (2). On the SAP Process Integration Runtime tile, select the three dots …, and choose Create (3).
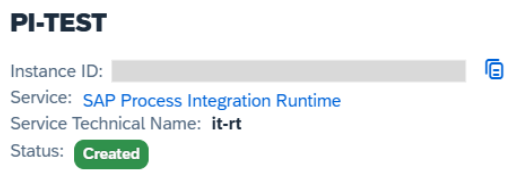
- Select the api plan from the Plan dropdown menu of the SAP Process Integration Runtime service (1). You can leave the values for Runtime Environment and Space unchanged. Enter an Instance Name, PI-TEST (2), and choose Next (3).

- The following roles are required for the instance: WorkspacePackagesTransport, WorkspacePackagesRead, and WorkspacePackagesEdit. Select them from the Roles dropdown menu (1), and choose Create (2).
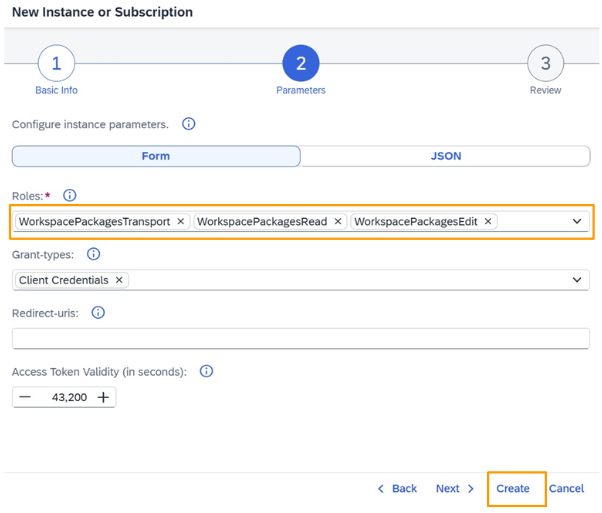
- The SAP Process Integration Runtime instance was created.
Create a Service Key for the SAP Process Integration Runtime Instance
The details of the service key of the SAP Process Integration Runtime instance are required for the configuration of the SAP Cloud Integration destination. The destination is required for the communication of SAP Content Agent with SAP Process Integration Runtime.
Follow the steps below to create a service key for the SAP Process Integration Runtime instance.
- In the service instance row, select the three dots …, and choose Create Service Key.

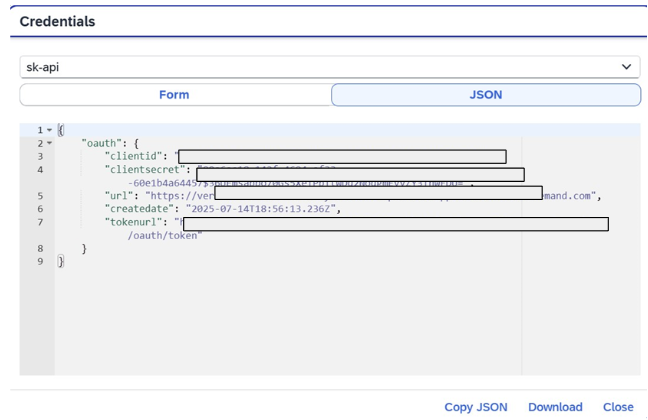
- Enter a name for the service key, here sk_api (1), and choose Create (2).

- The service key was created. Select the three dots … in the service key row, and choose View. The service key looks as follows. Leave the service key open so that you copy the required values in the next step, or note down the values of url, clientid, clientsecret, and tokenurl.
Create Destinations in the SAP BTP Source Subaccount
Create an SAP Content Agent Destination
The destination to SAP Content Agent defines which SAP Content Agent the SAP Integration Suite communicates with. The destination has the fixed name ContentAssemblyService. To create it, you need some values from the service key of the SAP Content Agent instance that you’ve created in the previous step.
- Open source subaccount of your SAP BTP Cockpit in another browser window or tab

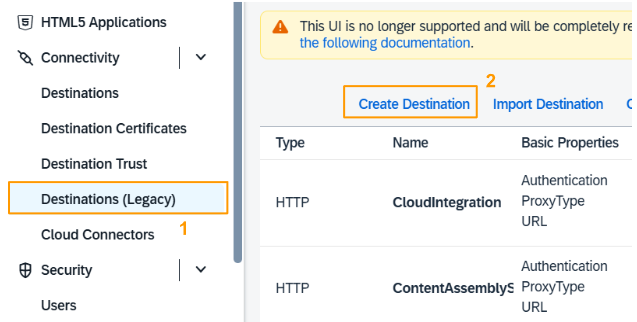
- Choose Connectivity > Destinations (1), and choose Create Destination (2).
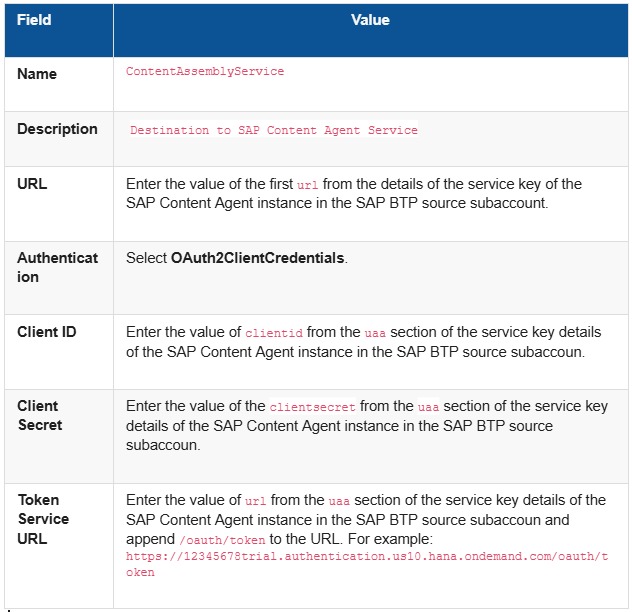
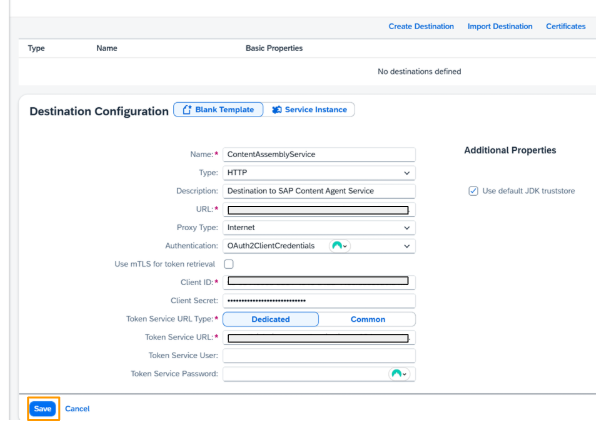
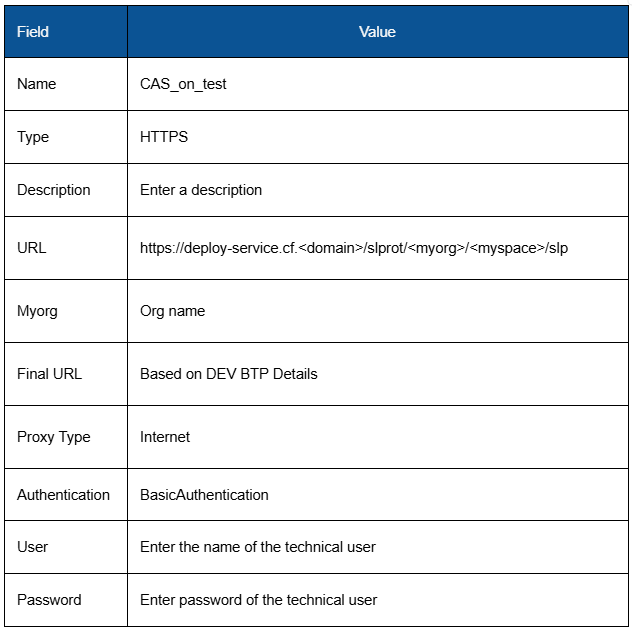
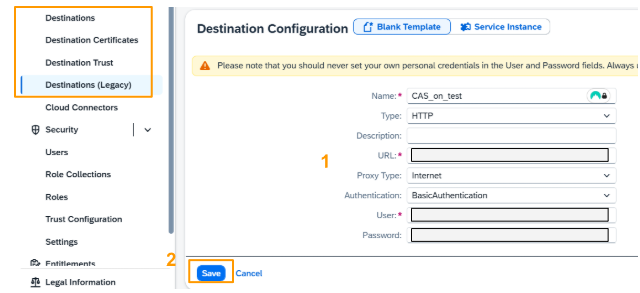
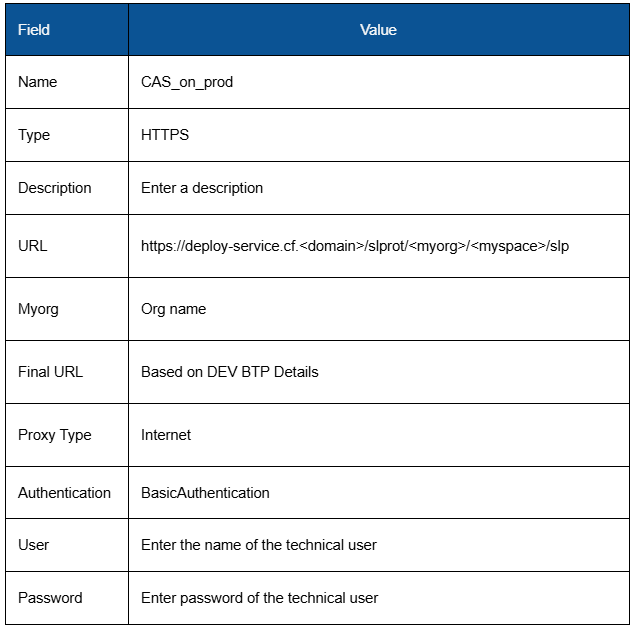
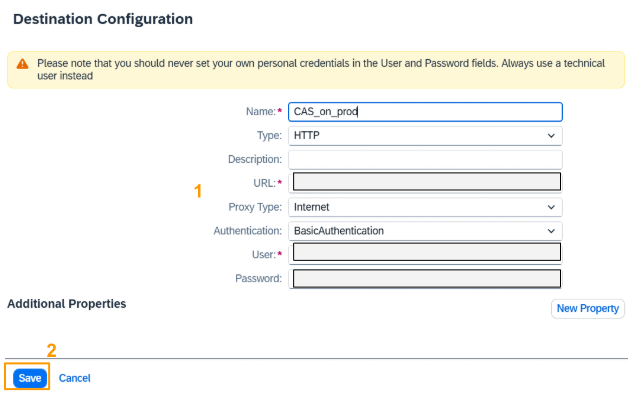
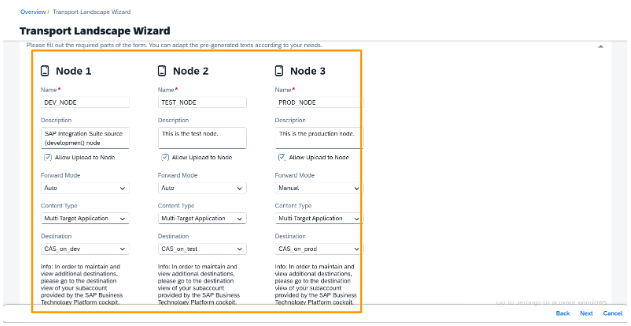
- In the Destination Configuration window, enter details for the following fields (1), and save the entries (2):
You will use the Content Agent Instance service key details in the SAP BTP source subaccount to fill the following destination configuration. Value of fields not mentioned in the table should remain unchanged.
- When you use Check Connection to test the connection, you’ll probably get a Connection to “ContentAssemblyService” established. Response returned: “401: Unauthorized” message.
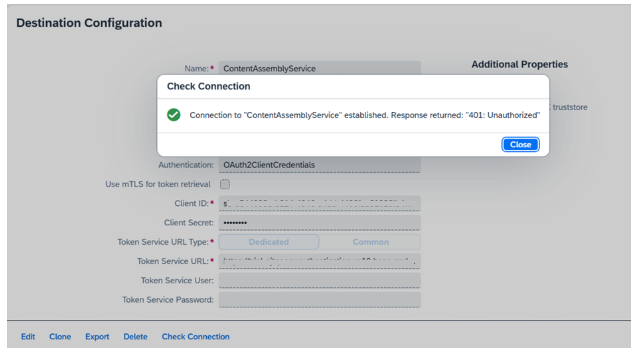
“Connection to “ContentAssemblyService” established.” means that the URL specified in the destination can be reached. The “401: Unauthorized” response is the expected response. However, such a successful check doesn’t guarantee successful deployment.
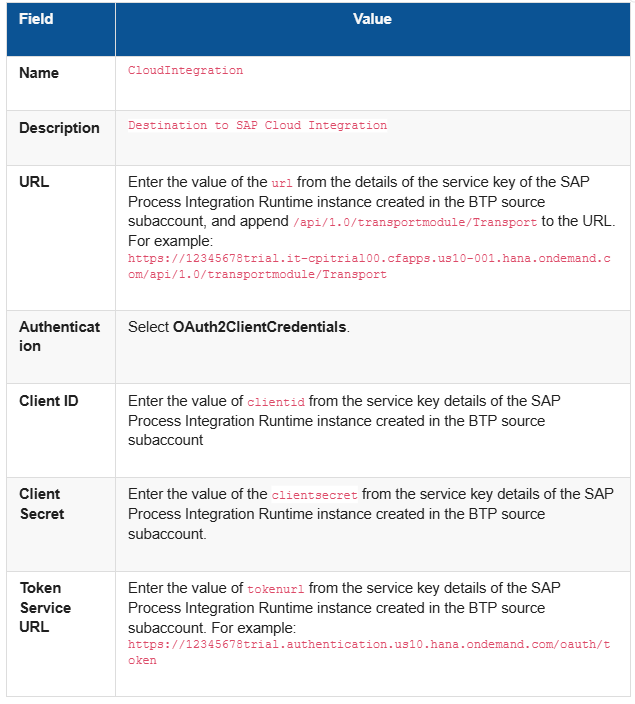
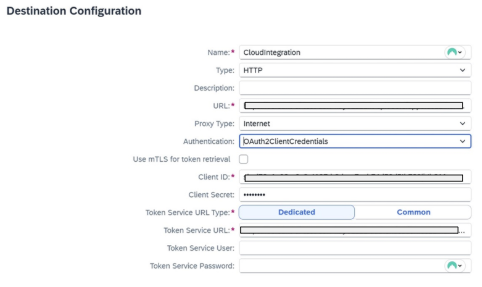
Create an SAP Cloud Integration Destination
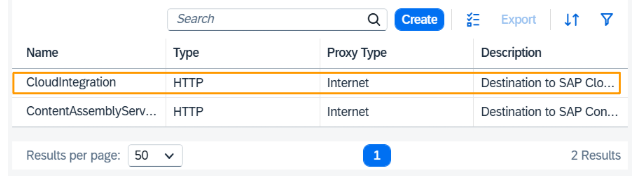
The SAP Cloud Integration destination serves as the endpoint where SAP Content Agent collects the content to be packed into an MTA and exported to SAP Cloud Transport Management service. The destination has the fixed name CloudIntegration.
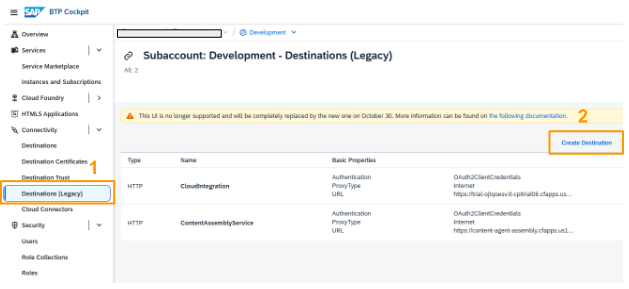
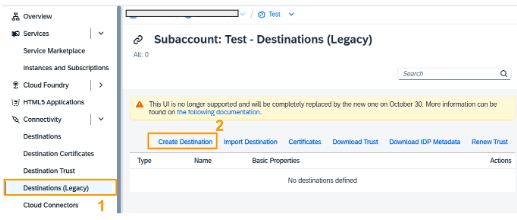
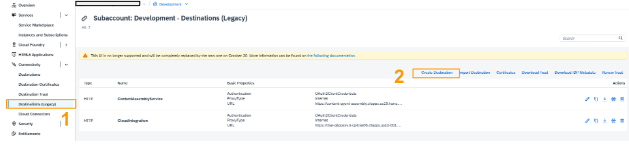
- In the source subaccount, choose Connectivity > Destinations (Legacy) (1). The destination to SAP Content Agent is displayed. To create a new one, choose Create Destination (2).
- In the Destination Configuration window, enter details for the following fields (1), and save the entries (2):
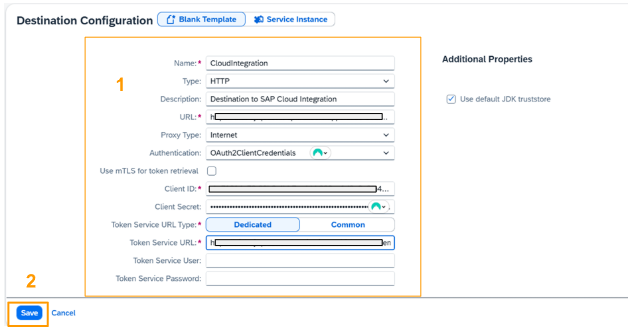
- Checking connection

- The destination was created.
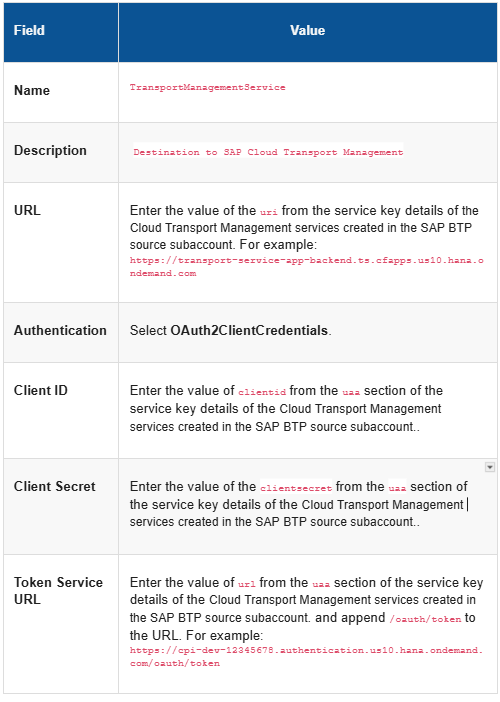
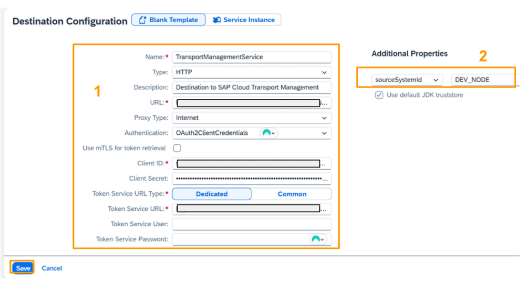
Create a Destination to SAP Cloud Transport Management
- Choose Connectivity > Destinations (Legacy) (1). The two existing destinations are displayed. To create a new destination, choose Create Destination (2).

- In the Destination Configuration window, enter details for the following fields (1), and then choose New Property to add an additional property (2).
You will use the Cloud Transport Management service key details in the SAP BTP source subaccount to fill the following destination configuration. Values of fields not mentioned in the table should remain unchanged. Save your entries.
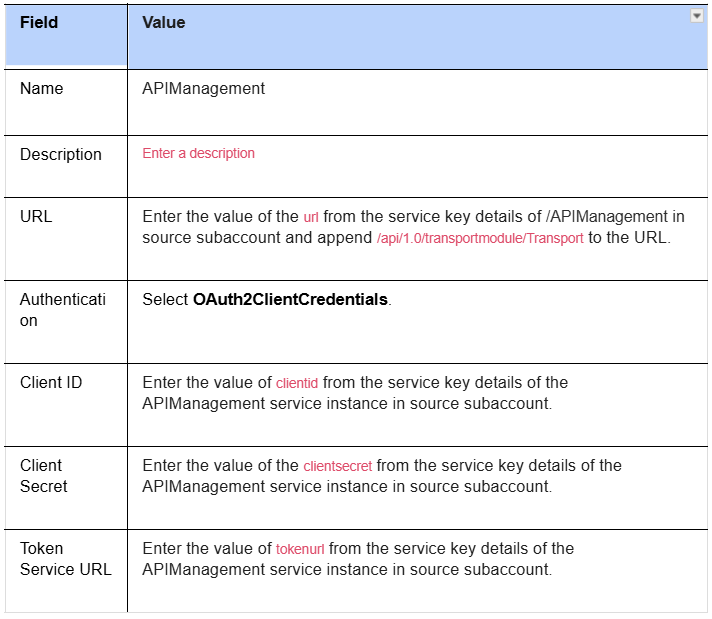
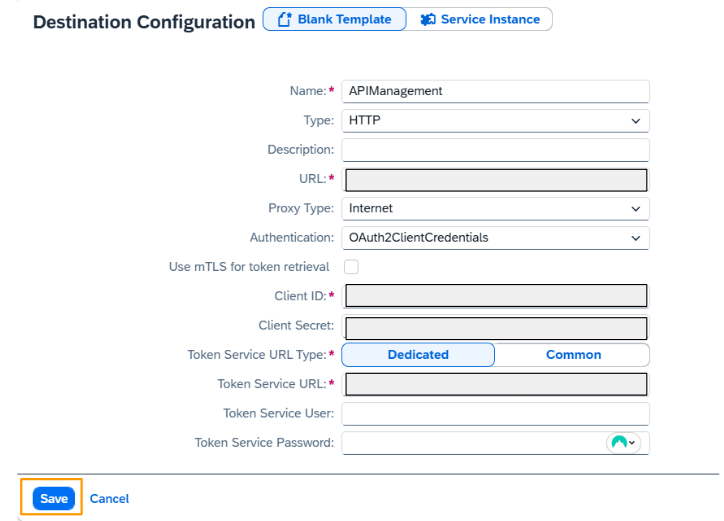
Create an SAP API Management Destination
You will use the API Management service key details in the SAP BTP source subaccount to fill the following destination configuration. Values of fields not mentioned in the table should remain unchanged. Save your entries.
Create Destinations in the SAP BTP Target Subaccount
Create an SAP Cloud Integration Destination
The SAP Cloud Integration destination serves as the endpoint where SAP Content Agent imports the artifacts. The destination has the fixed name CloudIntegration. You need the values of the service key from the SAP Process Integration Runtime instance created in the target account during the previous step.
- Choose Connectivity > Destinations (Legacy) (1). To create a new destination, choose Create Destination (2).
- In the Destination Configuration window, enter details for the following fields, and save the entries:
You will use the SAP Process Integration Runtime instance service key details in the SAP BTP target subaccount to fill the following destination configuration. Value of fields not mentioned in the table should remain unchanged.

Create a Target Destinations In Source Subaccount
We are going to create target destinations in the source subaccount. The transport destination defines the endpoint of the SAP Content Agent subscribed in the target account. This destination is assigned to the target node in SAP Cloud Transport Management.
Make sure that you have the details of the service key of the SAP Content Agent instance in the target subaccount at hand.
Target Destination for the Development Node
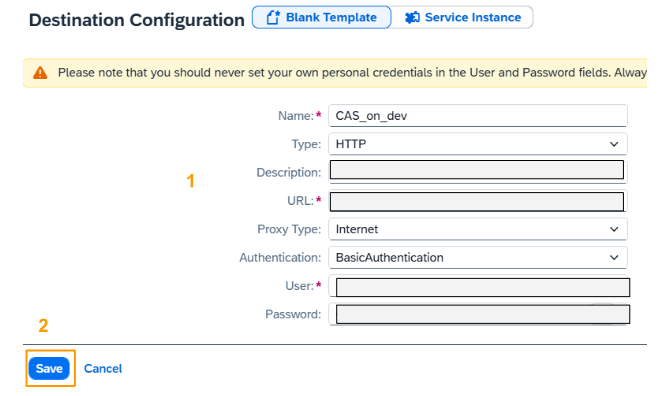
- In the source subaccount, choose Connectivity > Destinations (Legacy) (1). To create a new destination, choose Create (2)

- In the Destination Configuration window, enter details for the following fields (1), and save the entries (2):
- The destination was created.
Target Destination for the Test Node
- In the source subaccount, choose Connectivity > Destinations (Legacy) (1). To create a new destination, choose Create (2)
- In the Destination Configuration window, enter details for the following fields (1), and save the entries (2):Keep the values of fields not mentioned in the table unchanged.
- The destination was created.
Target Destination for the Production Node
- In the source subaccount, choose Connectivity > Destinations (Legacy) (1). To create a new destination, choose Create (2)
- In the Destination Configuration window, enter details for the following fields (1), and save the entries (2):
Keep the values of fields not mentioned in the table unchanged.
/
Create Nodes and Routes In the SAP Cloud Transport Management User Interface.
We will create
- Three nodes: Development (DEV_NODE), Test (TEST_NODE), and Production (PROD_NODE).
- Two routes: route_dev_test and route_test_prod
Perform the following steps in the SAP Cloud Transport Management UI.
- Choose the Source subaccount tile
- Choose Services > Instances and Subscriptions (1). To open the User Interface of SAP Cloud Transport Management, click on the link or the icon (2).

- The User Interface opens in a new browser tab or window. The first time you open the service, the home screen is empty.

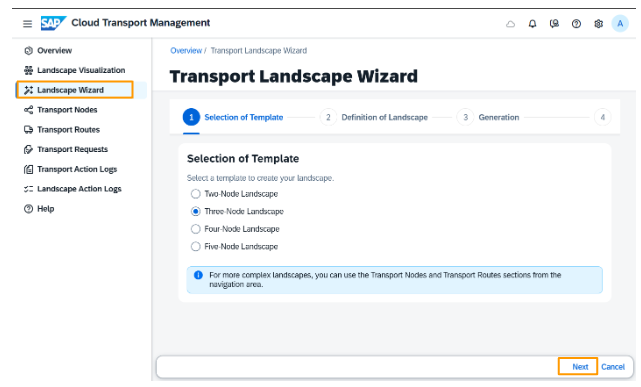
- To configure the nodes and routes, choose Landscape Wizard from the navigation on the left. Choose Three-Node Landscape
- We will add nodes and routes details to the fields below.
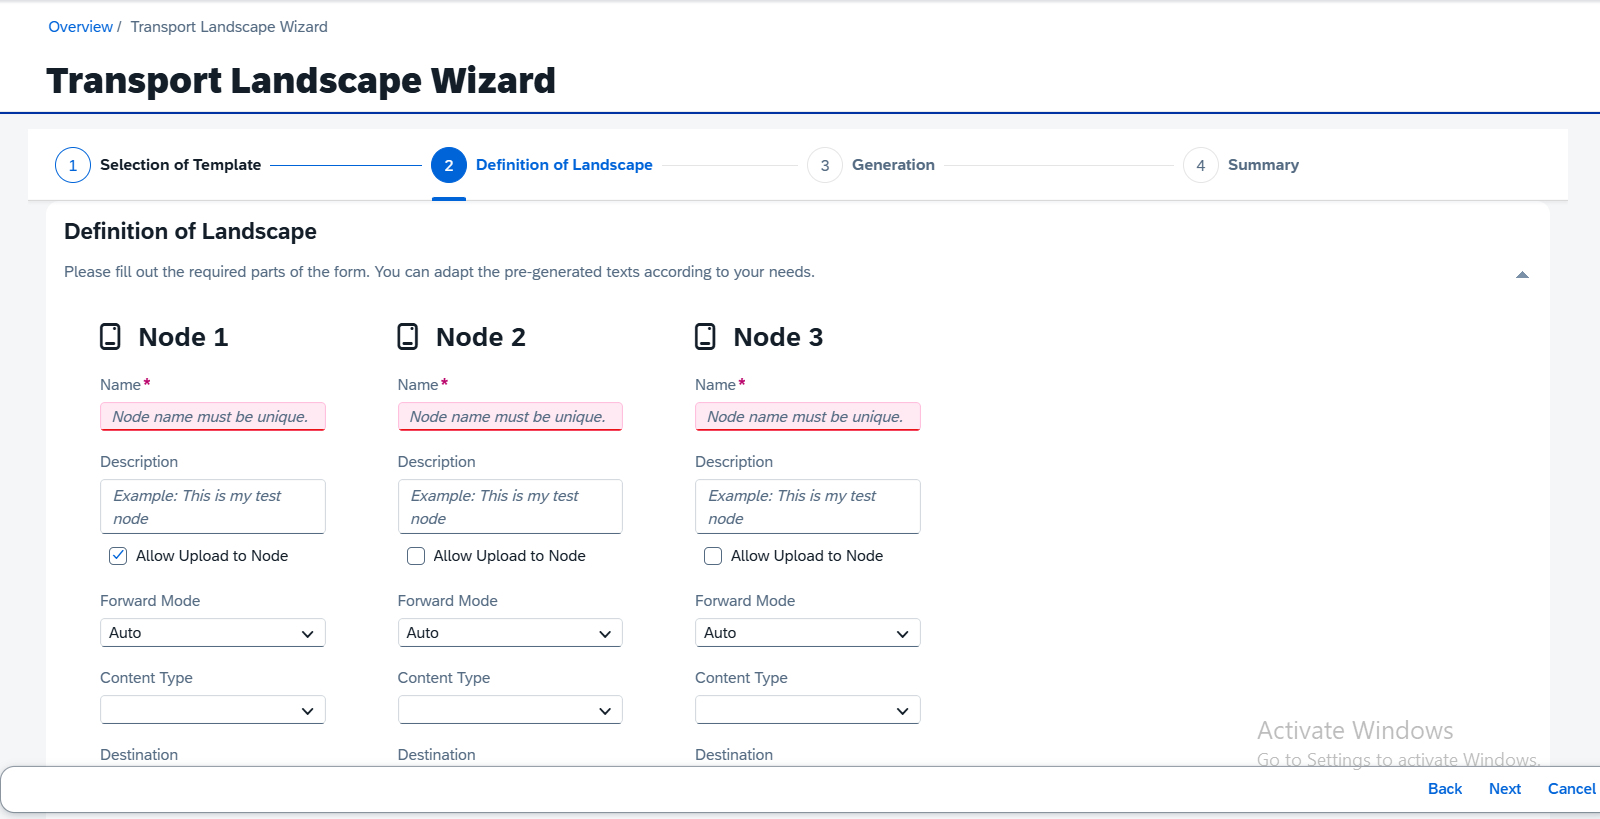
- Enter the details of each node shown below
Development node (DEV_NODE)
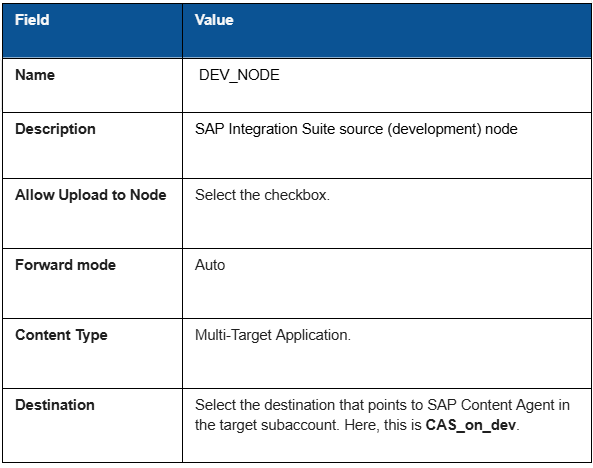
Test Node (TEST_NODE)

Production Node (PROD_NODE)

Routes details


- The transport route is created. Choose summary to view to see details of each node and route
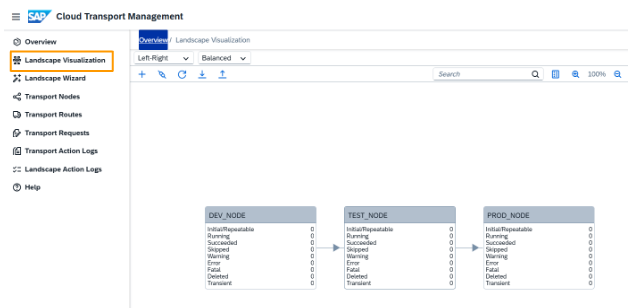
- In the Cloud Transport Management UI, choose Landscape visualisation to view the nodes and routes.
Enabling the Transport in SAP Integration Suite
Assign Transport-Related Role Collection to SAP Integration Suite Users
SAP Integration Suite users who will use the transport function, need the permissions of the WorkspacePackagesTransport role template. In this step, you create a role collection based on the corresponding role template and assign it to your user.
- In the Development subaccount, choose Security > Role Collections . Choose Create to create a new role collection.
- Enter a name for the new role collection, here CPI-Transport (1). Choose Create (2).

- The role collection was created. You see it in the list of role collections that’s filtered by transport here. To add the corresponding role template and assign users, click anywhere in the row.
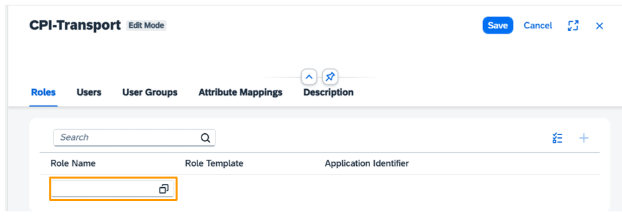
- In the role collection details, choose Edit.

- You’re now in edit mode. To add the role template, click in the entry field in the Role Name column.
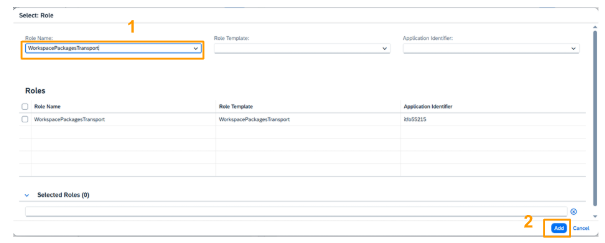
- Filter for WorkspacePackagesTransport and select the role template from the dropdown menu (1). and choose Add (2).
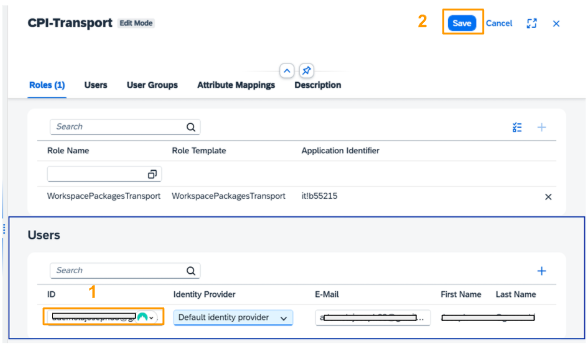
- The role was added to the role collection. To add the role collection to individual users who will transport artifacts, start with your user. Enter your email address in the ID field in the Users section, and choose Enter (1). To add other users that also need this role use the + icon and repeat the previous step. To finish, choose Save (2).
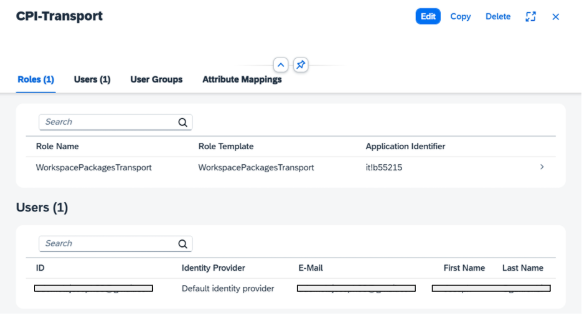
- Your user now has the permissions to transport SAP integration suite atifacts.
Enable the Transport in the SAP Integration Suite User Interface
You can begin transporting artifacts once you enable the transport in SAP Integration Suite. To accomplish this, select Transport Management Service as the transport mode from the SAP Integration Suite User Interface. This setting specifies that artifacts will be transported via the SAP Cloud Transport Management service.
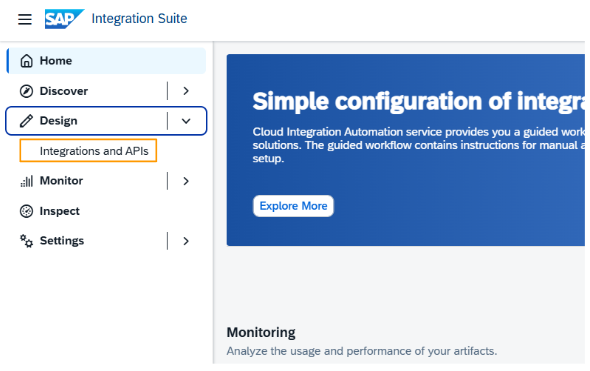
- In the Source subaccount, choose Services > Instances and Subscriptions (1). Open the user interface of SAP Integration Suite by clicking on the link or the icon (2).
- The SAP Integration Suite User Interface opens in a new tab or window. Choose Settings > Integrations (1). Go to the Transport tab (2), and choose Edit (3).
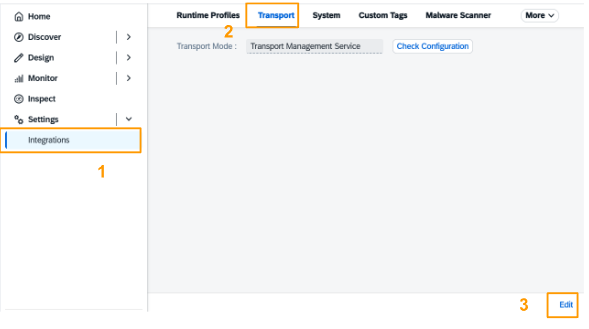
- Choose Transport Management Service from the dropdown (1). Choose Save (2).

- You get a success message.
- To verify that SAP Integration Suite can reach the DEV_NODE configured in the SAP Cloud Transport Management destination, choose Check Configuration.

6.. The result is SUCCESS.

- You’ve now completed all configuration steps required to transport artifacts from your source subaccount to your target subaccount.
Test your Transport
You need to verify before the transport that the SAP integration suite artifact doesn’t exist in the Design section. After the transport, you’ll verify that it was imported there
Start the Transport
- In your source subaccount. Choose Services > Instances and Subscriptions (1). Open the user interface of SAP Integration Suite by clicking on the link or the icon (2).

- In the SAP Integration Suite user interface, Choose Design > Integrations and APIs (1). Click anywhere in one of the content row to go to the detail view (2).
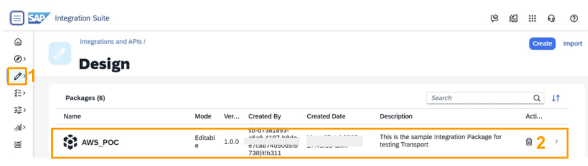
- The details of the integration flow are displayed. To start the transport, choose Transport.

- On the Transport dialog, enter a comment (1). Select the Propagate logged-in user as transport owner checkbox (2), so that your email address will be displayed as Owner of the transport request in SAP Cloud Transport Management. Choose Transport (3).
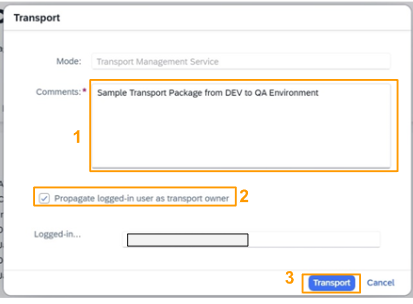
- The integration flow was packed into an MTA. It was attached to a transport request and put in the import queue of the target node in SAP Cloud Transport Management service.

Verify That SAP integration suite artifact is Not Available in Target
Verify that the integration flow is not yet available in the Design section of SAP Integration Suite in the target subaccount.
- Choose the SAP BTP target (TEST) Subaccount tile.

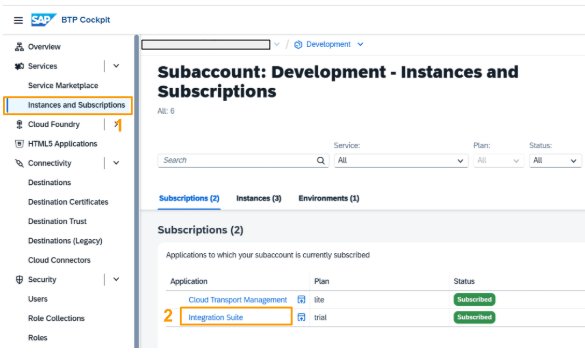
- Choose Services > Instances and Subscriptions.
- Click on the Integration Suite link.
- The SAP Integration Suite user interface opens in a new browser tab or window.. Choose Design > Integrations and API.
- The Design section in the SAP Integration Suite target is empty.

Import the Integration Suite artifacts
- To open the user interface of SAP Cloud Transport Management, in the Source subaccount, choose Services > Instances and Subscriptions (1). Click on the Cloud Transport Management link or the corresponding icon to open the user interface (2). The SAP Cloud Transport Management service user interface opens in a new tab.
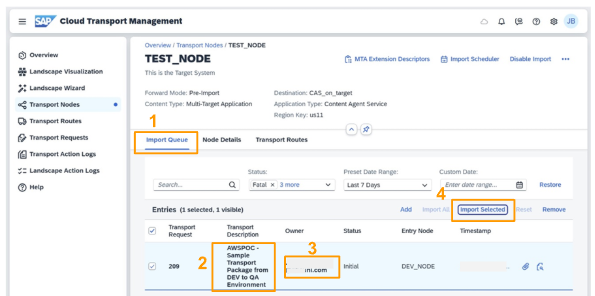
- On the home screen of SAP Cloud Transport Management, you can see that a transport is pending in the TEST_NODE. Click on this entry.
- The transport request created for the artifact was added to the import queue (1) of TEST_NODE. The name of the integration package and the comment you entered when you started the transport in SAP Integration Suite is displayed as the Transport Description (2). Your user email address is displayed as the Owner (3) of the transport request. To start the import, select the iartifact you want to import and choose Import Selected (4).
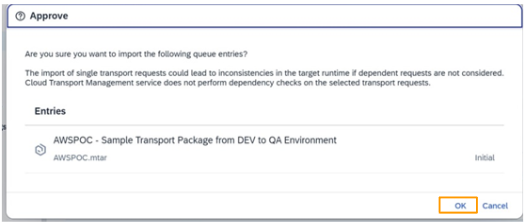
- Approve the import of the integration content into the target node by choosing OK.
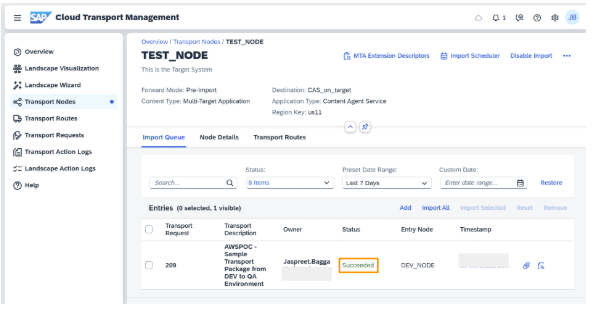
- When the import is successful, the status of the transport request changes to Succeeded.
- You can display more details about the import in the log of the transport request. To display the log, click on the log icon.
- The log contains detailed information about the individual import steps. When you scroll down to the end, the log shows that the import has ended with the status Success
Verify The Successful Import
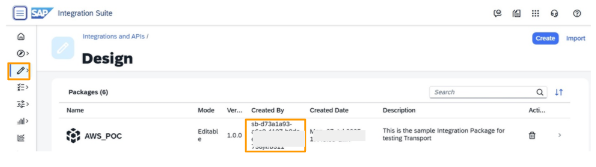
- Return to the SAP Integration Suite user interface on the target (TEST) subaccount to verify that the artifact has arrived there. Since you had previously opened the user interface, refresh the browser to reload the user interface.
- In the Design section in the target subaccount, you can now see the integration package. The credentials of the client ID from the SAP Content Agent service key on the target subaccount are displayed as the user who created the integration flow. This way, you can confirm that the integration flow was imported in the target subaccount.
Congratulations! You have successfully set up the scenario to transport SAP Integration Suite content using SAP Cloud Transport Managemen and SAP Content Agent.
CONCLUSION
In this blog, we have demonstrated how to transport SAP Integration Suite artifacts between subaccounts in a controlled way by integrating SAP Cloud Transport Management and SAP Content Agent.
FAQs
Why integrate SAP Integration Suite with SAP Cloud Transport Management Service?
Answer: This integration enables a controlled transport of SAP integration suite artifacts across different tenants. For example, the transport of iflow packages from development environment to QA environment.
What are the prerequisites for transporting SAP Integration Suite artifact using CAS with SAP Cloud Transport Management Service?
Answer:
- SAP Integration Suite subscription
- SAP Cloud Transport Management subscription
- Service instances and keys for Content Agent Service, SAP Cloud Transport Management Service, SAP Process Integration Runtime
- SAP Content Agent destination, SAP Cloud Integration destination, SAP Cloud Transport Management destination
- Transport source node and target node configuration
- Roles collection assignment for SAP Content Agent Service, SAP Transport Management Service, and SAP Integration Suite
-modified.png)

Do you want to
learn more about integration?
We are dedicated to make our knowledge accessible. You can either figure it out by yourself or you can let us give you a hand.
Let us take care of your integration.
We are SAP Certified and we can make your project happen. Explore our services and contact us. We will be happy to take on your project.
View Our Services